SiteVault Pro Documentation
Complete guide to protecting your WordPress site with SiteVault Pro. This professional backup solution includes scheduled backups, cloud storage integration, staging environments, one-click restore, incremental backups, and seamless site migration.
Getting Started
SiteVault Pro is a comprehensive WordPress backup solution that protects your site with automated backups, cloud storage, staging environments, and one-click restore. Never worry about losing your content, settings, or customer data again.
All Features
Manual Backups
One-click full, database, or files-only backups.
One-Click Restore
Restore your entire site with a single click.
Site Migration
Move your site to a new host with migration packages.
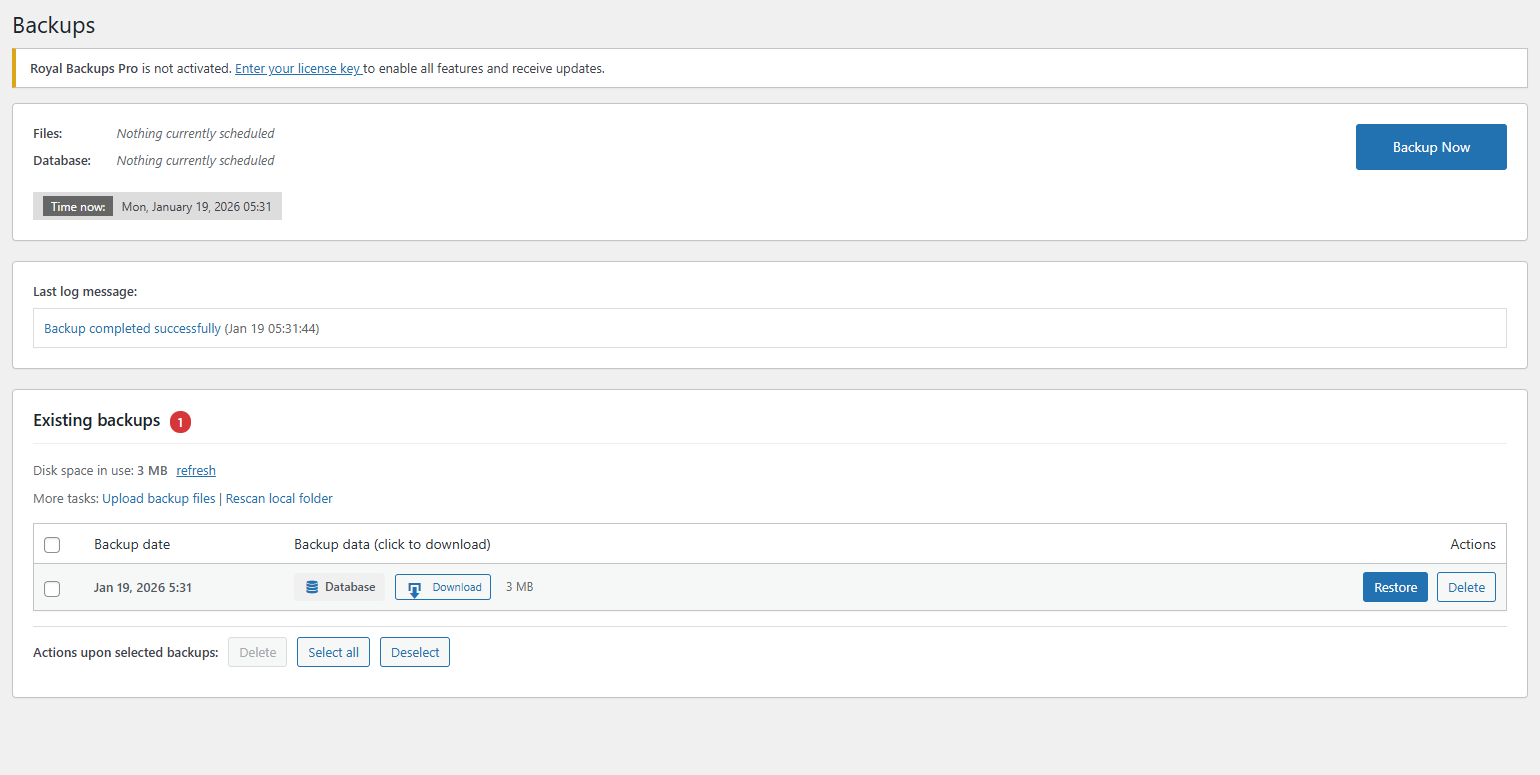
Backup Management
Download, delete, and organize your backups.
Scheduled BackupsPRO
Automatic hourly, daily, weekly, or monthly backups.
Incremental BackupsPRO
Only backup changed files to save time and storage.
Cloud StoragePRO
Sync to Google Cloud, Amazon S3, Dropbox, OneDrive.
Staging EnvironmentsPRO
Create staging sites and push changes to live.
Disaster RecoveryPRO
Restore without WordPress admin using recovery key.
AES-256 EncryptionPRO
Military-grade encryption for sensitive backups.
Database OptimizationPRO
Clean revisions, spam, transients, and optimize tables.
WooCommerce SupportPRO
Full support for orders, products, and customer data.
Requirements
- WordPress 5.8 or higher
- PHP 7.4 or higher
- Valid SiteVault Pro license
Installation
Download the plugin
Log in to my.royalplugins.com and download the SiteVault Pro ZIP file.
Upload to WordPress
Go to Plugins > Add New > Upload Plugin, select the ZIP file, and click Install Now.
Activate the plugin
Click "Activate Plugin" after installation completes.
Enter your license key
Navigate to SiteVault > License and enter your license key to unlock all Pro features.
Deactivate SiteVault before installing Pro. Your backups and settings will be preserved.
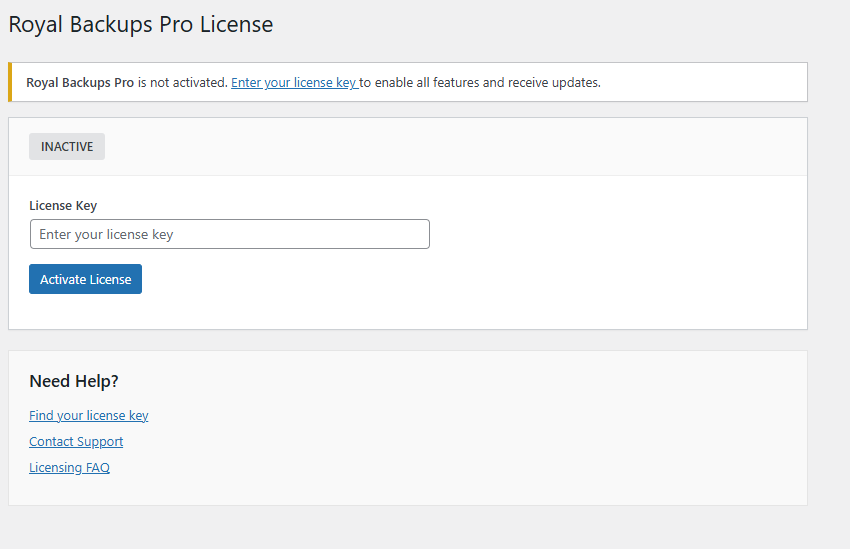
License Activation
Your license key unlocks all Pro features and enables automatic updates.
Activating Your License
Find your license key
Your license key is in your member account and was emailed after purchase.
Enter the license key
Go to SiteVault > License and paste your license key.
Click Activate
The plugin will verify your license and unlock all Pro features.
You can deactivate a license from one site and activate it on another through your member account or the plugin settings.
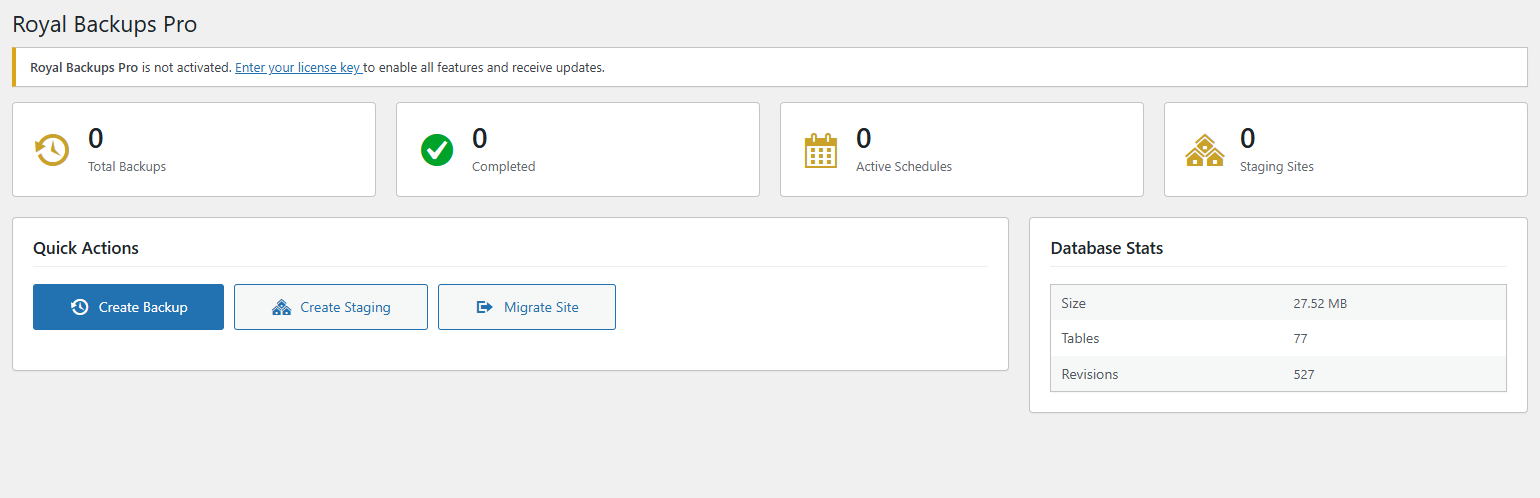
Dashboard
The backup dashboard gives you an at-a-glance view of your backup status and quick access to all features.
Dashboard Widgets
- Backup Stats - Total backups, completed, failed, and storage used
- Last Backup - Details of your most recent backup including type, size, and date
- Database Stats - Database size, table count, and revisions
- Quick Actions - One-click backup, create staging, and migrate buttons
- Upcoming Backups - Next scheduled backup times (Pro)
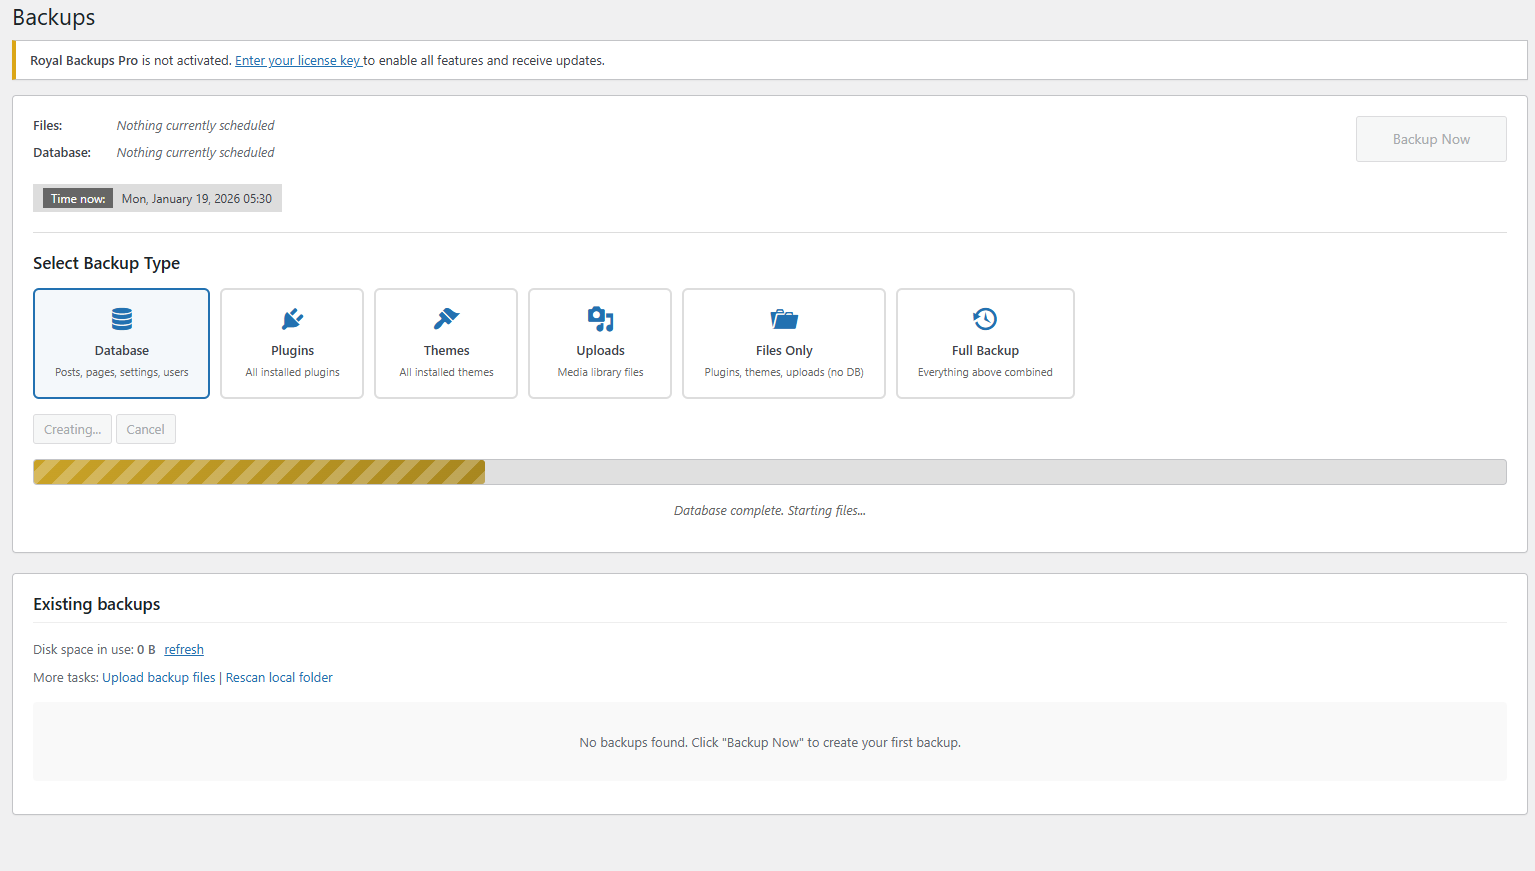
Manual Backups
Create instant backups of your entire site, database only, or files only with one click.
Backup Types
| Type | Includes | Best For |
|---|---|---|
| Full Backup | Database + all files | Complete site protection |
| Database Only | MySQL database | Quick content backup |
| Files Only | Plugins, themes, uploads | Large media libraries |
| Plugins Only | All installed plugins | Before plugin updates |
| Themes Only | All installed themes | Before theme changes |
| Uploads Only | Media library files | Media-heavy sites |
Creating a Backup
Go to SiteVault > Backups
Access the backups page from the WordPress admin menu.
Select backup type
Choose Full, Database, Files, or a specific component backup.
Click "Create Backup"
The backup will run in the background. You'll see real-time progress.
Always create a backup before updating WordPress, plugins, or themes. This lets you quickly restore if something goes wrong.
Restore
Restore your site from any backup with a single click. Choose to restore everything or just specific components.
Restore Options
- Full Restore - Restore database and all files
- Database Only - Restore posts, pages, settings, users
- Files Only - Restore plugins, themes, and uploads
- Selective Restore - Choose specific plugins or themes
Restoring from Backup
Go to SiteVault > Backups
View your list of available backups.
Select a backup
Find the backup you want to restore from and click "Restore".
Choose what to restore
Select full restore or pick specific components.
Confirm and restore
The restore process will run and you'll see progress updates.
Restoring will overwrite your current site data. If you want to keep current changes, create a backup first before restoring.
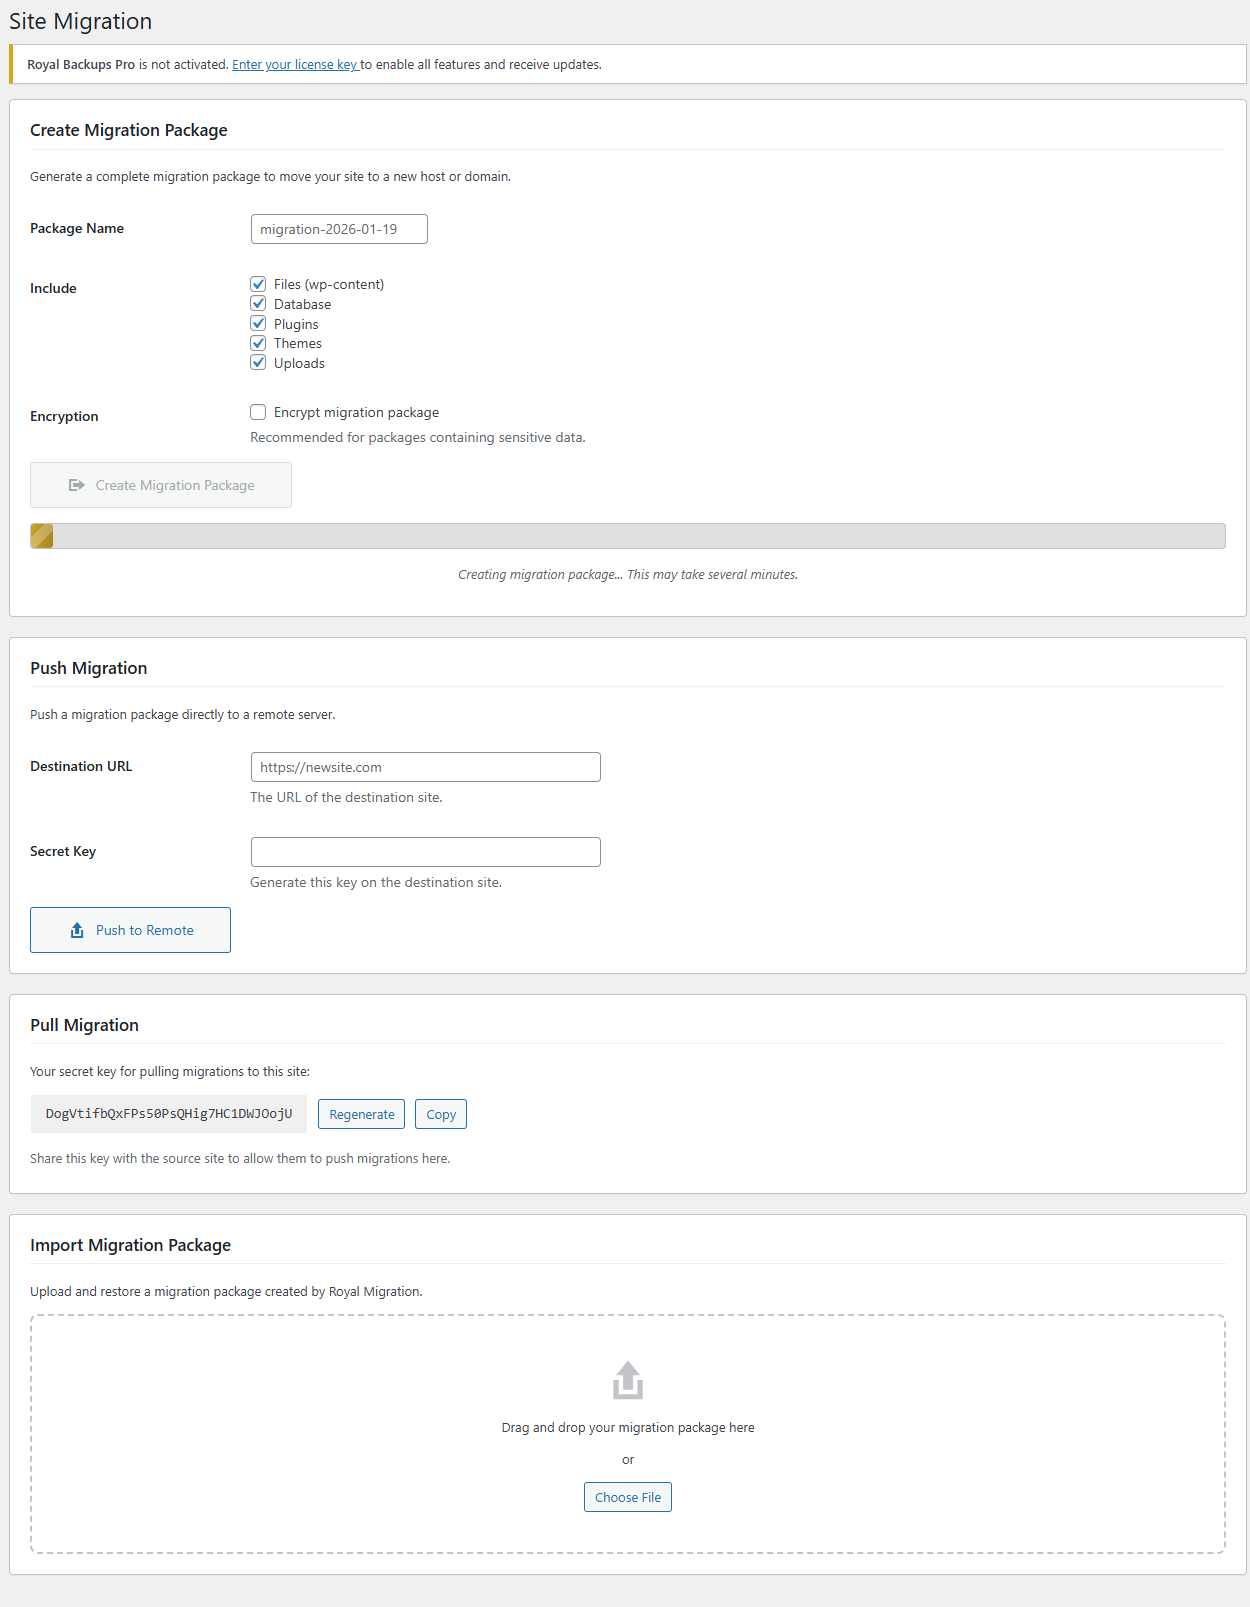
Site Migration
Move your WordPress site to a new host or domain with complete migration packages.
Migration Features
- Complete Site Package - Database, files, and standalone installer
- URL Replacement - Automatic find-and-replace for new domain
- Serialized Data Handling - Proper handling of WordPress options and meta
- Package Download - Download for manual upload to new server
Push/Pull MigrationPRO
Pro users can push migrations directly to remote sites or pull packages from other SiteVault installations without downloading files.
- Push Migration - Send packages directly to destination site
- Pull Migration - Receive packages with secret key authentication
- Encrypted Transfer - AES-256 encryption for secure transfers
- Chunked Upload - Support for large packages over 2MB
For detailed setup instructions and troubleshooting, see our Migration Troubleshooting Guide which includes:
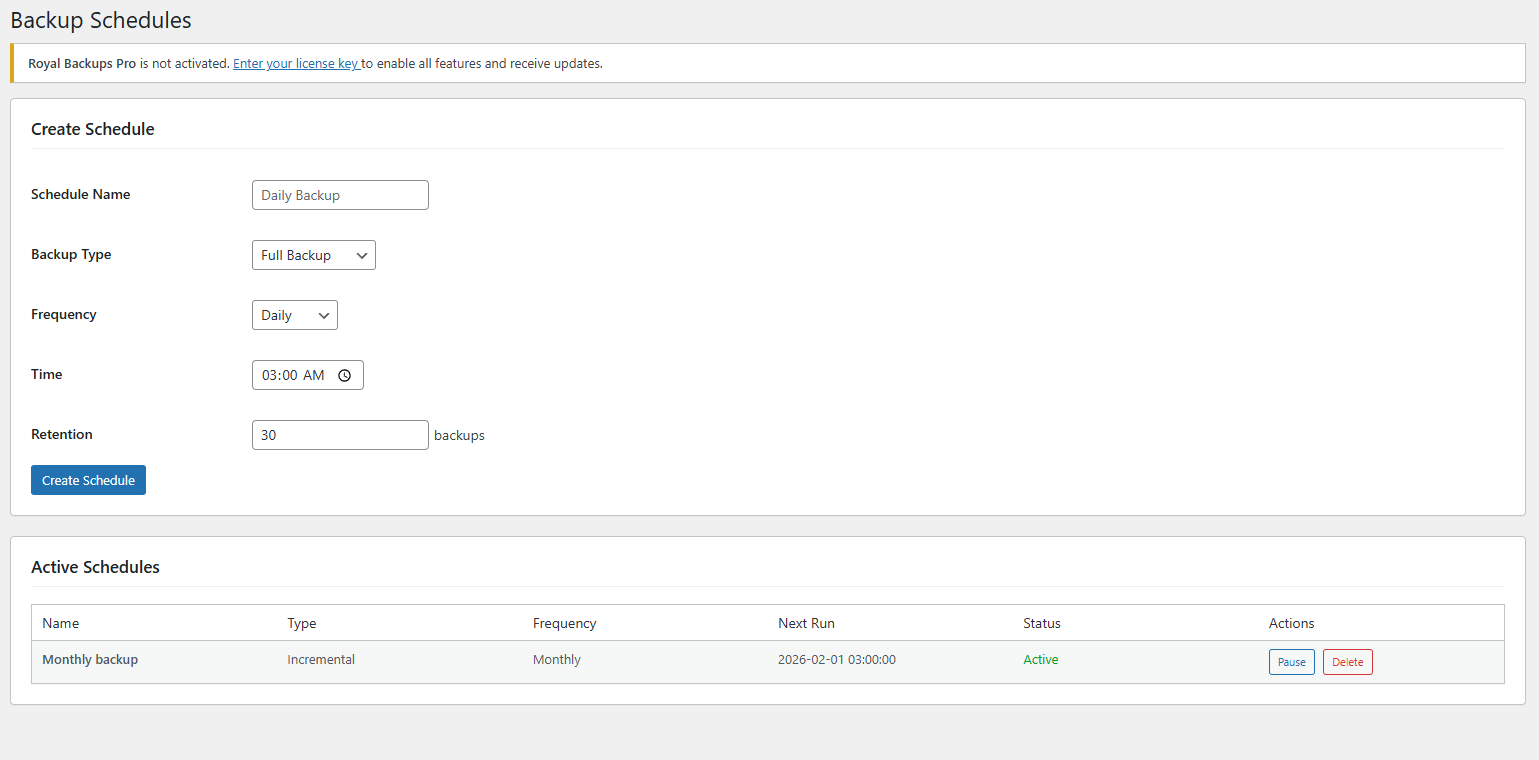
Scheduled BackupsPRO
Set up automatic backups to run on your preferred schedule without manual intervention.
Schedule Options
| Frequency | Best For |
|---|---|
| Hourly | High-traffic sites, e-commerce stores |
| Daily | Most websites (recommended) |
| Weekly | Low-traffic or static sites |
| Monthly | Archival or compliance purposes |
Creating a Schedule
Go to SiteVault > Schedules
Access the schedules page from the admin menu.
Click "Add Schedule"
Create a new scheduled backup configuration.
Configure schedule
Set the name, frequency, time, backup type, and retention policy.
Save and activate
The schedule will run automatically at the specified times.
Set a retention policy to automatically delete old backups and save storage space. We recommend keeping at least 7 days of backups.
Incremental BackupsPRO
Save time and storage by only backing up files that have changed since the last backup.
How It Works
- Creates a baseline snapshot of all files on first run
- Subsequent backups only include changed, added, or deleted files
- Dramatically reduces backup size and time
- Tracks file modifications, additions, and deletions
Benefits
- Faster Backups - Only changed files are processed
- Less Storage - Smaller backup files
- Lower Server Load - Reduced CPU and I/O usage
- Ideal for Large Sites - Perfect for media-heavy installations
Incremental backups require a full baseline backup to compare against. The first backup will be a full backup, subsequent runs will be incremental.
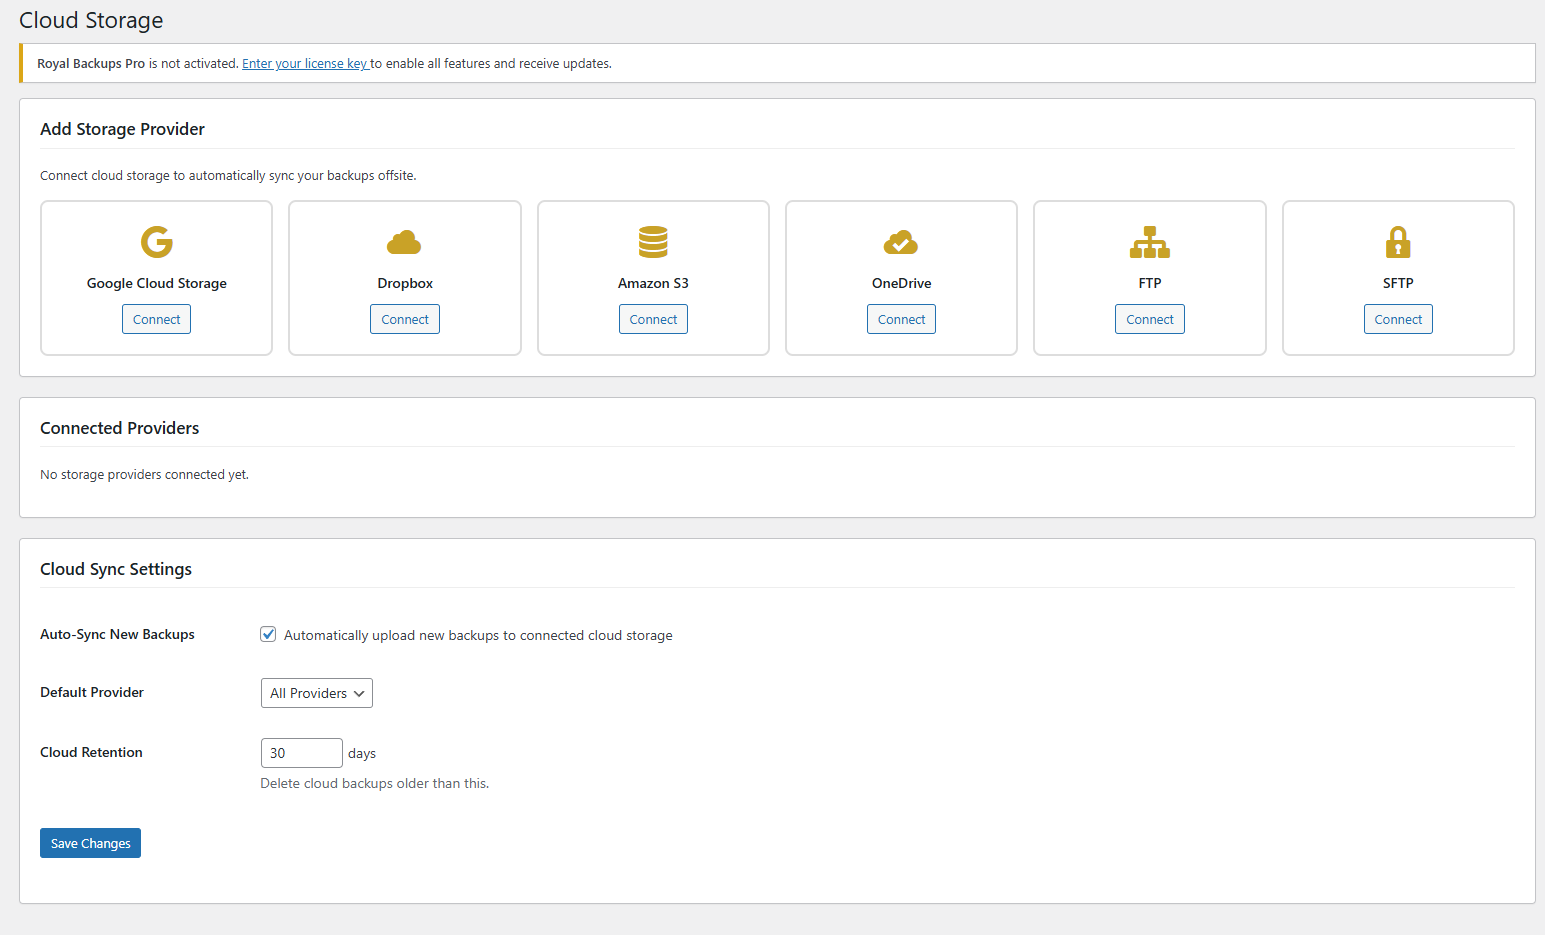
Cloud StoragePRO
Automatically sync your backups to secure cloud storage for off-site protection.
Supported Providers
Google Cloud Storage
HMAC authentication with Google's infrastructure.
Amazon S3
AWS SDK v3 REST API integration.
Dropbox
OAuth integration for easy setup.
OneDrive
Microsoft Graph API integration.
FTP
Traditional FTP server support.
SFTP
Secure SSH file transfer.
Setting Up Cloud Storage
Go to SiteVault > Storage
Access the cloud storage settings page.
Select your provider
Choose from the available cloud storage options.
Enter credentials
Provide your API keys, tokens, or login credentials.
Test connection
Verify the connection works before saving.
Cloud storage ensures your backups survive even if your server is completely compromised. We recommend always having at least one cloud storage provider configured.
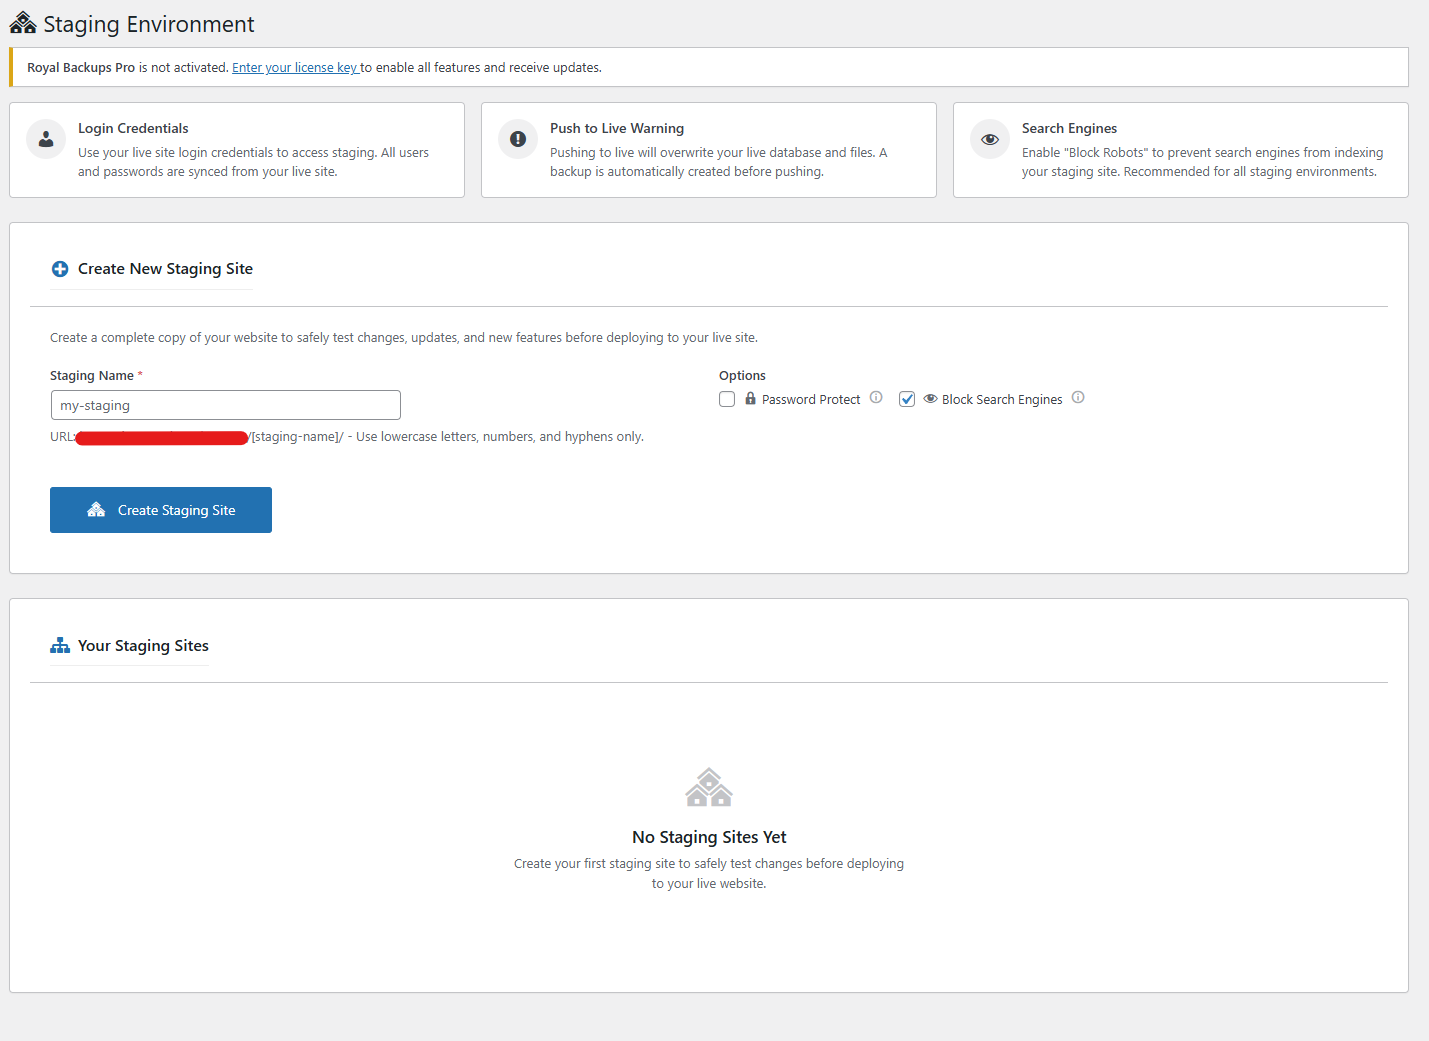
Staging EnvironmentsPRO
Create a complete copy of your site to test changes safely before pushing to production.
Staging Features
- One-Click Creation - Clone your site instantly to a staging subdirectory
- Separate Database - Staging uses its own database with unique prefix
- URL Replacement - Automatic URL updates for staging environment
- Password Protection - Optional password protection for staging
- Push to Live - Deploy tested changes to production
- Sync from Live - Update staging with latest production data
Creating a Staging Site
Go to SiteVault > Staging
Access the staging environments page.
Click "Create Staging"
Start the staging site creation process.
Configure options
Set the subdirectory name and password protection.
Wait for creation
The plugin clones your database and files to the staging directory.
When you push staging to live, a backup of your production site is automatically created first. You can restore it if needed.
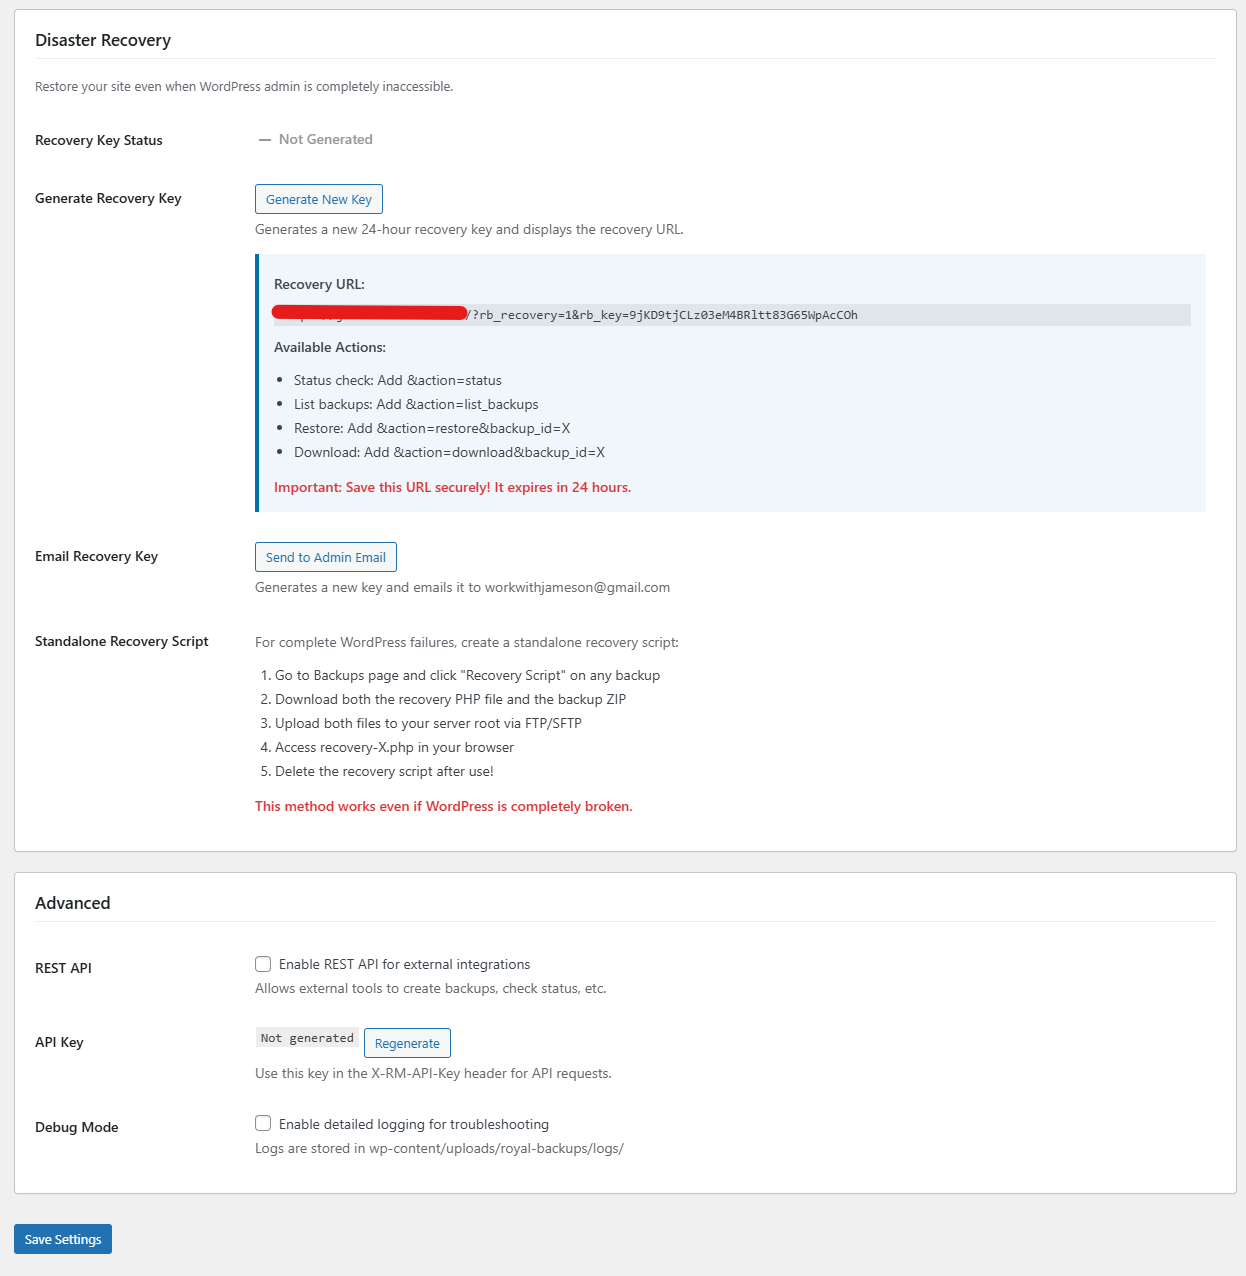
Disaster RecoveryPRO
Restore your site even when WordPress admin is completely inaccessible.
Recovery Features
- Standalone Recovery - Works without WordPress admin access
- Recovery Key - Secure 32-character key for authentication
- Direct URL Access - Access recovery via special URL
- 24-Hour Expiration - Keys expire for security
Generating a Recovery Key
Go to SiteVault > Settings
Access the plugin settings page.
Find Disaster Recovery section
Scroll to the disaster recovery settings.
Generate recovery key
Click to create a new recovery key. Save it somewhere safe!
Save your recovery key in a password manager or secure location outside your WordPress site. You'll need it if your admin becomes inaccessible.
Backup EncryptionPRO
Protect sensitive backup data with military-grade AES-256 encryption.
Encryption Features
- AES-256-CBC - Industry-standard encryption algorithm
- Per-Backup Toggle - Enable encryption for specific backups
- Custom Keys - Use your own encryption key
- Cloud-Ready - Especially important for cloud storage backups
If you lose your encryption key, you cannot restore encrypted backups. Store your encryption key in a secure password manager.
Database OptimizationPRO
Clean up and optimize your WordPress database to improve performance and reduce backup sizes.
Cleanup Options
- Post Revisions - Remove old post revisions
- Auto-Drafts - Delete auto-saved drafts
- Trashed Posts - Permanently remove trashed content
- Spam Comments - Delete all spam comments
- Trashed Comments - Remove trashed comments
- Expired Transients - Clean up temporary data
- Orphaned Meta - Remove orphaned postmeta, commentmeta, usermeta
- Duplicate Meta - Remove duplicate postmeta entries
Table Optimization
Run MySQL OPTIMIZE TABLE commands to defragment tables and reclaim disk space.
Always create a database backup before running cleanup operations. While safe, it's good practice to have a restore point.
WooCommerce IntegrationPRO
Full support for WooCommerce stores with granular control over what data to include.
WooCommerce Backup Options
- Include/exclude orders
- Include/exclude products
- Include/exclude customers
- Include/exclude coupons
- Include/exclude analytics data
- Exclude WooCommerce sessions (recommended)
Protected Tables
SiteVault properly handles all WooCommerce custom tables including orders, products, customers, tax rates, shipping zones, and payment tokens.
WooCommerce session data is automatically excluded from backups. Expired sessions are cleared before each backup to reduce size and prevent restore issues.
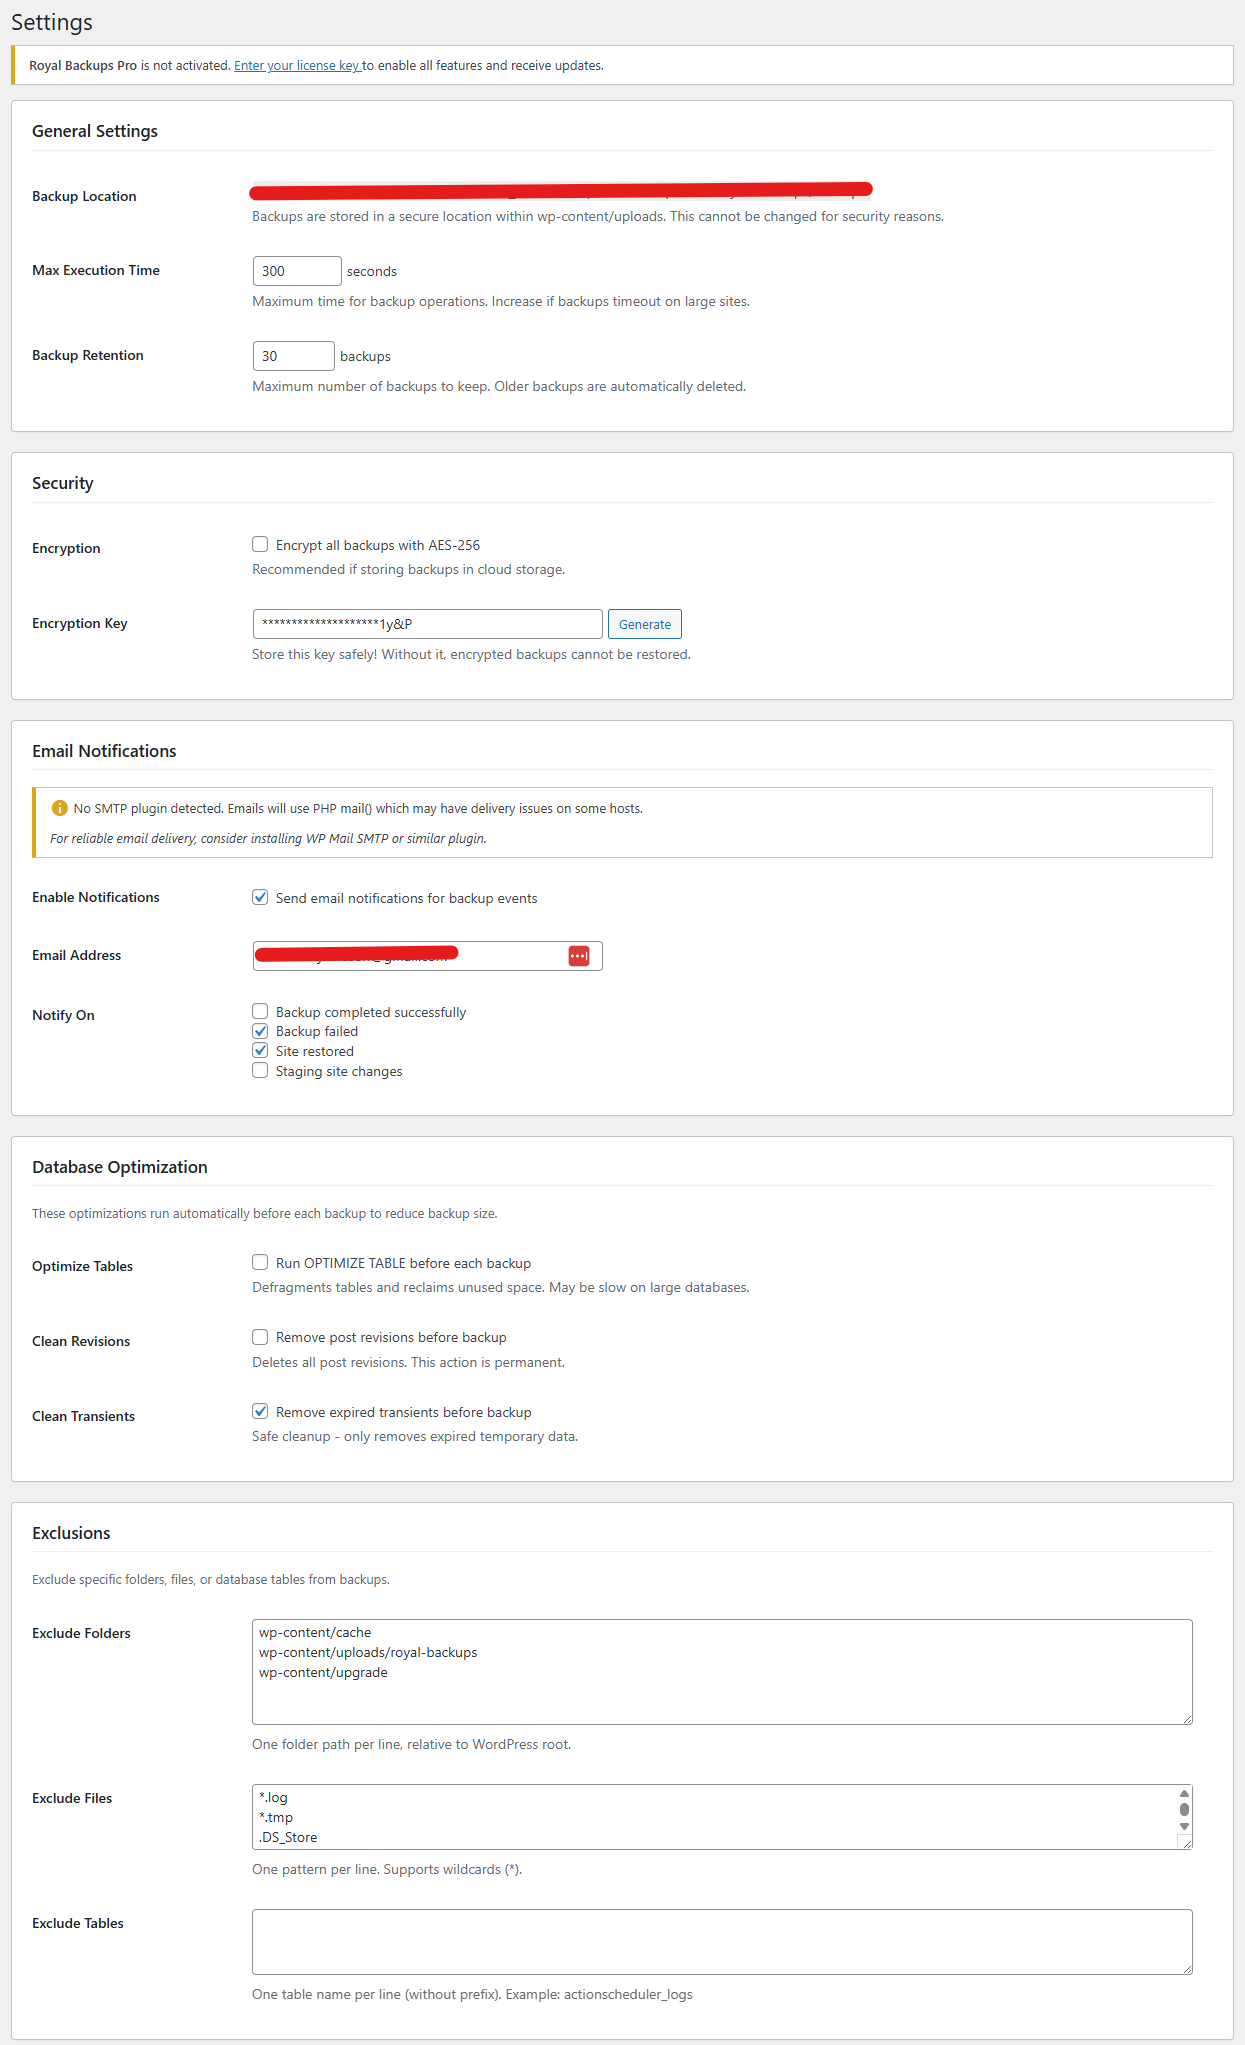
Email NotificationsPRO
Get notified about backup status, failures, and other important events.
Notification Types
- Backup success
- Backup failure
- Restore completion
- Staging creation
- Staging deletion
- Staging push to live
The plugin checks for SMTP plugins (WP Mail SMTP, Post SMTP, etc.) and warns if email delivery may not work. If you're on managed hosting, an SMTP plugin is highly recommended.
Troubleshooting
Having issues? Check our detailed troubleshooting guides or quick fixes below.
Migration Issues
Fix failed migrations, white screen after migration, URL replacement problems.
Staging Issues
Staging creation failures, SSL problems, push to live issues.
Disaster Recovery
Recover when WordPress is broken. Step-by-step emergency restoration.
Quick Fixes
Backup fails or times out
- Try a database-only backup first (faster)
- Increase PHP max_execution_time in php.ini
- Check available disk space on server
- Exclude large directories from file backups
Restore not working
- Verify backup file is not corrupted (re-download if from cloud)
- Check file permissions on wp-content directory
- Ensure database user has CREATE and DROP permissions
- Try restoring just database or just files separately
Cloud sync failing
- Re-verify API credentials
- Check if provider storage quota is exceeded
- Ensure server can make outbound HTTPS connections
- Check for firewall blocking cloud provider IPs
License not activating
- Check for extra spaces in the license key
- Verify you haven't exceeded your site limit
- Ensure your license hasn't expired
Contact our support team at support@royalplugins.com with details about your issue and we'll help you resolve it.
Frequently Asked Questions
How much storage do backups use?
Storage depends on your site size. A typical WordPress site uses 50-200MB per full backup. Enable incremental backups to dramatically reduce storage for subsequent backups.
Can I restore to a different site?
Yes! Use the migration feature to create a package with URL replacement. The package includes a standalone installer for easy deployment.
Are backups stored securely?
Local backups are protected with .htaccess rules preventing direct access. Enable AES-256 encryption for an additional layer of security, especially for cloud storage.
How often should I backup?
For most sites, daily database backups and weekly full backups work well. E-commerce sites should backup more frequently (hourly for high-traffic stores).
What happens if I exceed my license limit?
You can deactivate the license from one site to use it on another. Alternatively, upgrade to a higher tier for more site activations.
Does the plugin slow down my site?
No. Backups run in the background using async processing. Scheduled backups run during off-peak hours to minimize any impact.